
Anycubic Photon Review – SLA – LCD Resin Printer
(The actual review is below the updates)
UPDATE: Oct 31 — Do not buy this printer anymore.
It’s come to my attention that Anycubic has changed the main board on these printers. They are now 100% incompatible with the previous Photon printers, and there is no indication that it is a Fauxton vs a Photon Classic. You lose access to the Chitubox free slicer, that many (most) people use for their prints (or they use the Prusa slicer and finalize in Chitubox). It’s just a bad move all around. By changing the main board, they have changed the printer at a fundamental level. It’s not like an FDM printer. I have to change my review from the best LCD printer in the price range to a DO NOT BUY. Check out Elegoo Mars if you want to get a great printer in this price range (I have 2 and recommend them).
UPDATE: 3 Months on
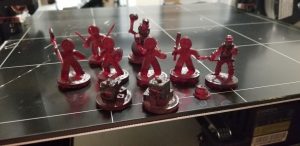
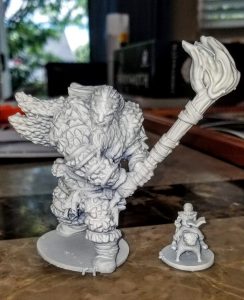
I’ve had this for another 3 months since I did this review. I still love this 3D Printer. Prints look so amazingly good. I’ve printed awesome looking cars with guns built on (using Meshmixer) for Gaslands. I’ve printed a Tau Kill Team while waiting for the official miniature box to arrive. I’ve printed miniatures for myself and friends. This thing is just awesome. I see zero lines (except sometimes internally, in transparent resin. You put a layer of primer on, and you will never see them. The community and Anycubic are 100% behind this 3D Printer as well.
UPDATE: 6 Months on (1/7/2019)
Holiday Horrors
https://www.myminifactory.com/object/3d-print-holiday-horrors-80355
This printer still rocks. I’ve had to replace the power supply on it. They are not the best power supplies, but they do work. Mine had been hanging on the rack my printer resides in, but the brick had slid down to the floor and the weight was resting on the wires coming out of the power brick. I know that is not optimum, but I don’t think it should have destroyed the power brick, either. I could get it to work work by moving the cables a bit, so I think it is a bad connection. But, for $12 I figured it was worth buying a new one. The printer is still going strong. I still love it. I love the prints it produces. I’m including some Christmas Horrors that Dragon Workshop / Chris Hunt released to show off its printing. 🙂 (Use code MYMAKERFUN3D for 5% discount on My Mini Factory). This printer continues to produce miniatures that are out of this world in terms of quality. For the recent Lost Dragons Kickstarter, I printed the shadow dragon at 200% size. I printed the head on the Photon to get that higher quality where it counts. Being able to mix the strengths of FDM printing and resin printing has been great as well.
The Official Anycubic Photon Review
 Claiming the Anycubic Photon the best resin based 3D printer is a bold move, but after printing with it for some time, I think it is a no brainer comment. Anycubic sent this 3D Printer for me to review. This is my opinion, and I was not paid for this review. I am reviewing this with an eye towards Miniatures and terrain for wargames. The Anycubic Photon Facebook Group features tons of great posts from people using them for custom jewelry and dental purposes. Less than two years ago, the Peopoly Maoi was revolutionary. It was an SLA printer for around $1000. A few months later, Wanhao introduced the D7, for less than $1000 bringing us the era of affordable Resin 3D Printers. (Though, resins are still on the expensive side, they too are coming down). Fast forward about a year from the Wanhao introduction, and we there were a number of contenders vying for the best, low-cost DLP resin printer. Including the Micromake L2, FLSUN -S Complete, Tevo Firefly (this project has been canceled as far as I can tell), Creality 3D LD-001, and the Anycubic Photon. Wanhao has gone through a number of iterations making it a better 3D Printer, and Anycubic was able to take those lessons and create an outstanding 3D Printer in their own right, the Photon. Click here for my live unboxing and preview page.
*This is based on price to performance, there are better resin based 3D Printers that cost much more
The Specs for the Anycubic Photon:
Price: Around $450. It’s about $440 from China (AliExpress/Gearbest) and closer to $434 from Amazon/U.S. (This drops down to about $364 when it goes on sale)
Build Area: 115 mm x 65 mm x 155 mm
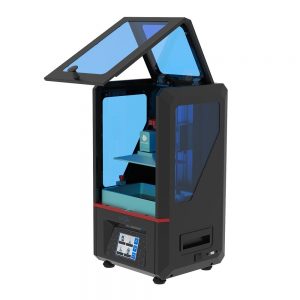
Technology: 405 nm UV LCD masking screen (2560×1440 resolution), Built in touch screen controller. Unlike the Wanhao D7, this 3D Printer comes with a built in computer to control the printer.
Using the Printer
Comparing SLA to FDM
– https://www.thingiverse.com/thing:2907934
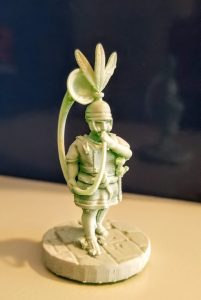
For this Anycubic Photon Review, I come from the FDM world, and have found Resin based printers very different. Many similar concepts, but very different. The first difference, is the slicer. I’m used to running Cura 3D and Simplify 3D. This printer uses its own slicer, that works well, if a bit slow. The touch screen is pretty simple, starting with 3 menu items. Moving the vat and zeroing it, printing, and other setup items. It works really well. The printer ships with a spare FEP sheet when yours runs out as well as gloves, resin filters, tools and other items. It also comes with 250ml of green resin. As a safety precaution I also wear safety glasses to protect my eyes from an inadvertent splash.
It’s actually pretty straight forward to print. You slice your model (a .photon file), put it on the USB stick, and then put it in the printer. You then level the printer (I use the Flint Reed method) though Anycubic has their way as well. From there, follow the directions and fill up the resin vat to 1/3 full. Click on the display and choose print, and then click the print job you want, and then the arrow to start it. Come back in a few hours to a completed print. It really is that simple. It’s getting the print ready to print, that is more difficult.
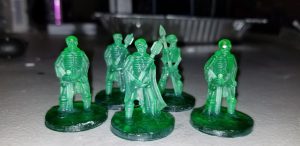
You can NEVER have too many Skeleton Minis – http://3dmkf.com/DL-Skel
When working with resin and Isopropyl alcohol I highly recommend protecting yourself and do your best to limit direct exposure. I wear Nitrile gloves and safety glasses when I am working on the printer, whether it is pre-print or post print. After that, I scrub really well. If I get any on me, I clean it with IPA and then go back and wash that area thoroughly with soap and water. I don’t want to scare anyone away, but I want everyone to be very aware that this resin is toxic. Limit your exposure to it as much as possible.
When running the printer, I tracked power usage. I saw a fluctuation between 17 watts and 41 watts, with an average watts used being 34. You can use this to calculate power consumption and costs. These are inexpensive when it comes to power.
Prepping prints – Slicing, Hollowing, and more.
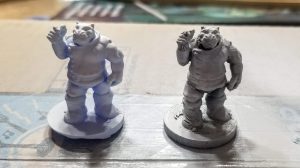
Game Of Thrones Giant – Gnome on a Pug
– http://3dmkf.com/Gnome-Pug
– https://www.cgtrader.com/free-3d-print-models/miniatures/figurines/giant-game-of-thones
Where you will have the most difficult time making the switch from FDM to SLA is learning the additional tools. While many times, you can do what you have always done, with the cost of filaments being $70 or more per liter, the first thing you will want to do is learn to hollow your models. Last year, Maker’s Muse released a terrific tutorial on this subject. This is honestly pretty simple, and Maker’s Muse breaks it down really well as to what to do. This is a bit of an update to the review, ChiTuBox is the company that makes the Photon slicer. It’s recently come out with many nice additions to their native slicer and it is worth picking up over the native Photon slicer for slicing models. It does a better job adding supports AND now hollows models. Many still use some of the other recommendations below too.
From there, you move on to supports. I am still a neophyte with this, and use auto-generated supports in the Photon slicer. It works, well enough, but it could be better. I have read that several people use the B9 Creator Software to generate supports. Another great reference, is the videos from Turenkarn’s 3D Tanks. He’s got some great videos on prepping models to print on the Anycubic Photon. Between these two sources you should be able to print well and begin to understand how to print better. Facebook Moderator, Artur Fuste has also created an amazing spreadsheet that lists all the variables needed for a large number of printing resins, with more being added regularly by the community. Speaking of community, I’m the admin on the Anycubic Facebook Group. We have some very helpful and dedicated individuals that help with printer problems, and show off great new prints they have done. Check out the sticky at the top that features many of the links mentioned here, and others like a 10% discount on Monocure Filament.
Cleaning up the prints / post-processing
Mimic – https://www.thingiverse.com/thing:2843119
My early 3D Prints, I printed directly onto the build plate. Now, I tend to use supports. While I know this sadly uses more resin, it has the added bonus of being a LOT easier to remove from the build plate. So, I honestly recommend starting there. When you are done printing, I use a palette knife (for painting) to slide under the print. It is very thin, and seems to work exceedingly well for this process. Using larger tools, I have had more problems, and have knocked my bed out of alignment on several occasions. If I don’t do that, the level on the bed remains for quite a few print jobs.
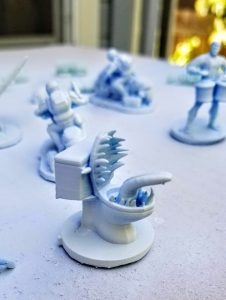
After I pull off the print, I use my snips to remove all of the supports. I find it is much easier to do before curing, and keeps the vat from filling up with as much resin. Once I have cleared the supports (and some models are much worse than others), I transfer the print to an Isopropyl alcohol bath. (Use at least 90% IPA, 99% is better). After that, swish the print around. I know some people use a toothbrush to remove all uncured resin. From there, you can do a second IPA bath to make sure you get all of the resin off, and then transfer it to a water/soap bath to clean the model. From there, I either put the model outside in the sun, or under a UV light. I generally find around 10 minutes is needed, longer under the lamp. But, you can feel the model with your fingernail. If it is a little springy/tacky, it needs cured more. If not, you are done. I also use a disposable baking dish to do my work in, to contain the resin. My Photon is in another disposable dish, JUST in case the FEP sheet leaks.
After that final cure, you can prime and paint, or just admire the print jobs. And if you come from the FDM world, realize these are beautiful prints. After owning this for a month and a half and doing dozens of prints, I am still blown away with how good these prints look.
The costs – Resin / Post processing
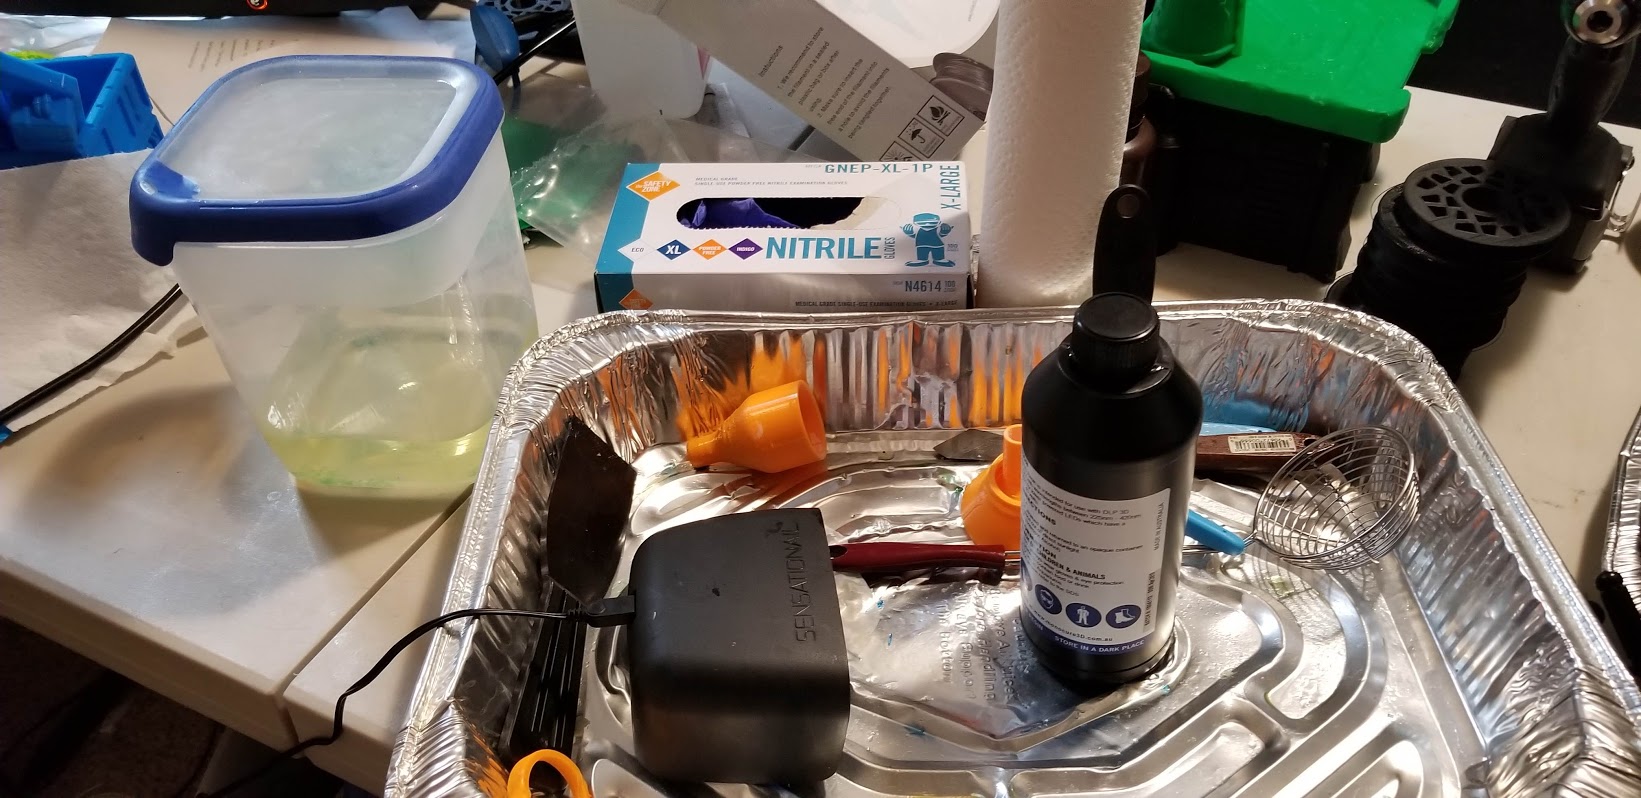
Anycubic Photon Review – My supplies
SLA printing is different than FDM printing. After you buy your 3D Printer, you have to supply it with resin. Resin is a significant cost. A 500ml bottle of Anycubic Resin runs $50 from Amazon.
With the Monocure Rapid from Australia, costs can be down to about $150, shipped, for 3 liters. So far, I have really liked this resin. Another less expensive resin, is Fun to Do, though getting it in the U.S. is a little more difficult than many places in the EU. Finally, Harz Labs has been supportive of the group as well. The resin prints well, and looks really good. Please realize, these are the resins I have had exposure to. If it is not on the list that does not mean it is bad. It means I have not tried it, or seen several others try it.
For post processing, you are better off buying Isopropyl alcohol by the gallon, and paper towels by the case. Plus the Nitrile gloves. It is a more complex version of 3D Printing, but at the end of the day, the prints are worth it. I put together this list to help you get started on the stuff you need to get started with resin printer. I’d say down to the UV Nail dryer are must-haves. And the UV nail dryer could be subbed with a DIY solution as well.
Anycubic Photon Modifications
Like anything popular in the 3D Printing world, there are a number of mods for this printer. Some people hook up major filters to the back of the Anycubic Photon to help clean the airstream to even vent it out doors. If you check out the Facebook group, and you can search for ways people have done this.
Finally, I have put together a Thingiverse Collection of Anycubic Photon upgrades. The Resin Filtering Funnel (two pieces) is really nice.
Anycubic Photon Review : Terrific Printer / Terrific Price
All Roads Lead to Rome – http://3dmkf.com/KS-AllRoads
As you can see, this is a terrific printer at the price. It can do a level of detail that is impossible for an FDM printer to do. The Anycubic Photon is also able to do it for a low cost. As more people get into 3D Printing with resin based 3D Printers, I can see their costs going down, and more importantly, I can see the resin costs going down as demand increases and economies of scale kick in. When I say this is the best DLP printer around, I do mean that for the price, you can’t beat it. There are other Resin based 3D Printers out there, but for ease of use (check out how you level others, with multiple screws, it’s nowhere near as simple), cost, and quality, this is the best resin based 3D Printer available. I would not hesitate to recommend this 3D Printer if you are looking to print fine details in the jewelry industry, dentistry, or just for fun.
Where to Buy – Support this site
While I may receive printers to review from companies, the only way I make money is through affiliate links. If you find this review helpful, and choose to purchase this printer or another, please click on the affiliate links when you order. It doesn’t cost you one bit more, and I get a small commission on the sale.
Anycubic Photon at Gearbest
Check out some prints that have come off my Anycubic Photon
[ngg_images source=”galleries” container_ids=”13″ display_type=”photocrati-nextgen_basic_slideshow” gallery_width=”600″ gallery_height=”400″ cycle_effect=”fade” cycle_interval=”10″ show_thumbnail_link=”1″ thumbnail_link_text=”[Show thumbnails]” order_by=”sortorder” order_direction=”ASC” returns=”included” maximum_entity_count=”500″]


Umm if they sent the printer to you for you to review it and you never paid for it you WERE paid.
No. Some people are actually paid to do the review above and beyond getting the printers for free. The long and the short of it is, when you get a number of 3D Printers for free, they all start at the same point of reference. And you can look around the community and see that my views are 100% in-line. You may want to split hairs, but that doesn’t make you right. No money changed hands. This is how a great many items you see on the internet are reviewed. If you want consumer reports style, go to Consumer reports and pay for a subscription for their reviews. Search for E180 on my site for a free printer you say I got paid for. I assume you think I only do good reviews (well, this was a preview because the printer failed and I made note of it at the end of the preview.)
Anycubic honest review.. You got paid to write this shit. The printer Anycubic Photon S is shit and so is there customer service. Wait a month or two the parts break the LCD screen packs up or the motherboard malfunctions. Honest review stay away from their products. 400 hundred bucks of pure crap. Mine is under warranty and so far thay have done nothing about replacing parts, thay have pulled their customer service because there getting too many complaints.
You will soon see a full video review and I will demolish there reputation over night and drive their sales into the ground a bunch useless cunts. I seen so many amazing reviews there all fucking idiots who get paid or given tec to review for free. Fuck off you retards and stop claiming every 3D printer that comes along is amazing. The anycubic is a piece of shit don’t waste your money and time. Now that’s how to review and how to be honest.
I’m not so sure that you actually READ my review, or even the title.
1) I reviewed the Photon Classic. The older version. It was a great printer, in its time.
2) I changed the title to Do Not Buy Anymore because they changed the main board.
3) My review is not on the Photon S which is a completely different machine.
4) Have you tried the Facebook Group? Their Social Media team is generally on top of things.
5) Everyone’s experience is different. I don’t claim every 3D Printer that comes along is amazing, just the ones that are. You are coming in really late. Things are different today, than they were 2 years ago.
6) Don’t come here and say I am dishonest because you have problems, and quite likely don’t know how to run these printers well. Maybe a resin printer is not for you?
Anycubic tech support is crap. Their support consists of having the poor sucker who bought it to get help from other poor suckers who have come up with workarounds for the deficiencies of the product. The certainty of the workarounds is that it worked for me so henceforth, this is what you need to do. WTF. Why should any device in this day and age of electronics be so finicky? After combing the internet for solutions for weeks, I finally reached out to their team to find out the whole company was closed for the lunar new year. In that time, I documented all that I tried. When I finally did get a response, the support person basically asked me to try something that I already informed them that I tried and what the outcome was. I explained that to them and they never responded. After a while of no response, they sent me a request to review their support. I decided that the hardware brick I have is probably a good foundation for me to upgrade the motherboard to a Raspberry Pi which can actually read USB drive reliably, As part of this project, I bought a Creality Ender 5+ which pretty much worked right out of the box except for a problem with a poorly installed Y end stop sensor. I absolutely love my Ender 5 plus if you can even call it that. It’s been upgraded.
Receiving a free printer from a manufacturer completely taints the idea of it being an honest review. Besides receiving something for free, that something you received is probably handpicked as the best representation of the product. Do you think they will send you one of the broken ones?
It’s time for these manufactures to stop using customers as alpha testers. They should develop a stable, working product where QA occurs at the factory and not in our workshops.
Thanks for the thorough review!
Now after some time has passed since motherboard changes, would you consider making another update to the review?
I’m mainly asking because it’s possible that some of those early troubles have been fixed. Still deciding between photon and mars and I’d appreciate your input.
I would recommend the Mars over the Photon. It has the brighter light source so it prints faster. That is worth it on its own. I would love the Mars electronics in a Photon body. I prefer the Photon ergonomics with the door and USB placement, but honestly, you interact with the machine very little compared to the amount of time you spend printing. I would recommend looking at the Phrozen Sonic Mini as well, with its Monochrome LCD. If you are ok with the smaller build size, then I think it is the way to go, again, because of print speed. (They now have a metal vat and sloped bed).
The Photon is older tech. Beyond pulling what Anycubic did, which also invalidated much of my review, I really think it was great when it came out, but they really need to upgrade it somehow to compete with newer printers. I’d say they barely had a hold when it came to Photon vs Mars. With the changed board, I would say it dropped further. I really hate recommending 3D Printers I have not tested.
I know this is an old article but still people will find it. Although there are other printers now that may have brighter screens any you may not recommend it the reason you have listed in the DO NOT BUY comment no longer holds true.
You just need to update your firmware to get the Photon working 100% with the Fauxton board and Chitubox or any other slicer compatible with the Classic.
Here is a Reddit article from back in February 2020:
https://www.reddit.com/r/AnycubicPhoton/comments/f8jhpm/how_do_i_know_if_i_have_a_fauxton/
If you do an additional update I think stating that the price on Amazon (with Prime at least) as of today of $189 is a worthwhile update as well. Even though there are some faster models not many exist at this price for this quality.
The big problem, is they did it behind the community’s back. We as a community had to call them out on it and it was not easy to get a confirmation from them that they made changes. It was, at its root, an anti-consumer decision. The other issue, is that I reviewed a Photon. The Fauxtons are a different model. So, what I reviewed and what is listed as a Photon are different machines.
Actually $169 direct from Anycubic