Upgrades for your new i3 based 3D Printer
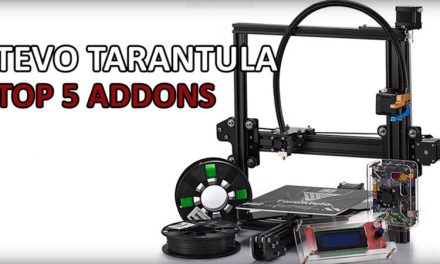
This guide was created to share upgrades for the Tevo Tarantula, but many parts are interchangeable between other i3 based designs like the Anet A8, Anet A6, Greetech i3, JGAURORA, and many others. For those ordering a new printer, I created a post quickly going over the options. Once you order, this is the post for you. Building a Tevo Tarantula is just the start of the fun. It’s a solid printer out of the box, but there are a number of weaknesses that can be overcome with either printing, or buying additional parts. I view the upgrades in several categories, and some upgrades span categories. The categories I used: Key Upgrades, Safety, Structure, Ease of Use, Aesthetics, Calibration. These are also the order I recommend printing, with a few outliers. When I setup my new printer, the first thing I did, was print a calibration cube. This gives me a baseline to start from. After I am “done”, I plan on printing another one. So, after I purchased my printer, there were several pieces I ordered with it, including the safety items listed below and anything ordered from China.
Key 3D Printer Upgrades for your new printer:
These are those upgrades I highly recommend. Some for safety, some for better quality prints.
- Heat Bed Power Module Expansion Board – or Mosfet (Amazon | AliExpress): This is the first safety item I purchased, alongside the printer. This shunts the power to the bed through here, instead of the main board. In my reading, this was the #1 way to reduce melted power connectors. It is also very inexpensive.
- Washers – Lots and lots of washers. I used a ton of #10 washers, others recommend #8. You will also need a number of M3, M4, and M5 washers, but not nearly as many as the first two. I recommend some nylock nuts as well in the M4 and M5 size.
- 5015 Blower Fan (Amazon | AliExpress): This is used for making a “Fang Fan” for layer cooling. This was the second upgrade I printed. Rui Raptor did an interesting video showcasing four layer cooling designs.
- Dual Z-Axis Upgrade: ( AliExpress ) This is a kit directly from Tevo for upgrading your 3D Printer to a dual-Z Axis. For an even more inexpensive version, you can check out the Dual Z-Axis Parts page and put together the parts yourself. This is one of the key upgrades to a better print.
- Replacement Parts: There are a couple of replacement “kits” for the Tarantula. One is Aluminum, one is Carbon Fiber. The Y-carriage is the key upgrade component, out of these, though a full replacement is also good for your acrylic parts.
- Perry Posthoorn’s Tevo Tarantula Aluminum Parts : Newer kits, came up with a new Y-carriage design. This is the one I personally own and recommend you purchase. It really does make a MAJOR difference in quality of prints AND reliability.
- Mackers.IT Carbon Fiber Parts Kit
- Read even more about the different kits, and compare it to printing upgrades or leaving the acrylic.
- Raspberry Pi 3 (Amazon| Aliexpress): This is used for building a little Octoprint server to run the 3D Printer. This lets you monitor it (with a webcam) and remotely manage your 3D Printer from a web connection. This upgrade is a huge convenience.
Safety:
- Plug and 5 amp Fuse Switch (Amazon | AliExpress): The power supply kind of sucks. You power it on by plugging it in, and power it off by unplugging it. This allows you to turn it on, and off, plus puts a fuse inline. If you want a much more robust switch (and willing to pay for it) this is a great alternative. ( Amazon )
- Power Supply Cover with Switch (Thingiverse): You just have to love a power supply with live connections. This covers those and allows you to install the power switch above.
- Check out my post on converting server power supplies for 3D printers. I link a few videos and a couple of pages about converting server power supplies to provide power for your 3D Printer. These are generally superior to the bundled power supply and are very inexpensive on the secondary market.
- Various power connectors : Ring and Ferrule are recommended a lot. I used both. Here is a good video on safely using them: https://www.youtube.com/watch?v=kjSGCSwNuAg
- Heat Shrink Tubing (Amazon): You need some heat shrink tubing if you solder wires together. Out of the box, you don’t have to do any soldering, but many upgrades (like making it modular and using power connectors) requires soldering.
Structure:
- T-Nuts (Amazon | AliExpress): These are intended for future upgrades to help with securing, squaring, and strengthening the printer. You want the 20 series M4.
- Strengthen your 3D Printer: General parts to print, good starting point, Cool Tarantula Corner Stiffener, Compact Corner Stiffener, Bed Adjustment Nut (Your fingers will thank you), and many, many others. The last link is my “upgrade” collection for Tevo Tarantulas.
Ease of Use:
- Glass: Glass is suggested because it remains flat while the bed may flex and distort with heat.
I bought a cheap Wal-Mart frame and used the glass out of it. It is smaller than my large bed, but I have not printed anything larger, either. I have read that you can go to a glass cutter and get 3mm-4mm glass for a few dollars, that is cut to the bed size.I now have custom cut glass from a hardware store. Ignore my old advice of getting a frame. It was cheaper to get two custom cut pieces of glass instead of a frame. For a lot more, you can get Gorilla Glass cut and shipped for your bed size: https://maker.glass - Cheap Ball Bearings (Amazon | AliExpress): These were used to build The Ultimate Spool Holder (TUSH). This was the first upgrade I printed.
- Optical Endstop (Amazon | AliExpress): This purchase is to build a filament out alarm, to alert you when you run out of filament.
Here is the video I first learned about it from: Optical Endstop.So, that video is no longer there. I hope it comes back. If it doesn’t, here is the optical sensor holder on Thingiverse with information on hooking it up to Octoprint. - Small JST connectors (Amazon | AliExpress): There are various parts that need connected. The layer fan comes to mind. I cut the end off of it, and replaced it with this JST connector on both ends.
- Wifi Smart Power Strip ( Amazon ): This is pretty cool. Remotely turn power sockets on/off, plus it has 4 slots for USB cords, if you are running OctoPi.
- Future upgrade – XT-30 and XT-60 connectors (Amazon: XT-30 / XT-60 |AliExpress: XT-30 / XT-60): I plan to use these with this Power distribution Bar to help with my cable management and make it easier to work on.
- Future Upgrade – Automatic Bed Leveling (Amazon | AliExpress Link): I picked up this inexpensive inductive sensor to try it out. I have many other upgrades to accomplish before I move on to automatic leveling.
Calibration:
- Calibration Cube (Thingiverse): This was the first print I made. It gives me a baseline on my printer.
- Temperature Tower: I have created a post about calibration prints, including the cube above. I print these with my filament to find out the best temperature for the spool.
Aesthetics:
- LED Strip Light (Amazon ): These make great ways to light your printer. From installing them inside an enclosure, to installing them right on your layer cooler (the author of the fang cooler above talks about installing 3 led lights on it), these are an inexpensive way to light your printer.
- The IKEA Lack Table (IKEA): At $7.99 each, these tables are used extensively and the 3D Printer world. You can find modifications for making the legs longer, as well as turning it into a full enclosure.



Thanks for posting this, I got my tarantula a long time ago, printed some stuff without any upgrades, then stopped using it cause I was busy. But now I have some time, this guide is super useful.
Can you go into more detail on the heat bed power module expansion board and the washers? What are power connectors and what happens if they melt? And where would the washers go? I’m new to 3D printers.
The ones I show work. I have purchased 4. They are pretty simple. What is happening, is you are routing the power for the heat bed through the mosfet instead of through the board. That is what it is doing. By reducing current on the board, you are reducing the chance to damage the power connectors. I generally hear people solder the connections to the bottom of the board, instead of through the connections.
Washers: You want to put them between the bolt and the acrylic. It is meant to distribute the load further out on the acrylic. This was my first 3D printer. Major learning curve, but you also learn a LOT.