Build Notes for building your Tevo Tarantula
After I build my Tevo Tarantula, I had to take it apart. I put together these build notes to help you avoid these same pitfalls. Here is what I went through, AFTER I had the Tevo Tarantula built.
The X-stop was not installed. That required the removal of the drive belt and X carriage to put it on.
After that, I realized the Z block assembly on the left, had the tab inverted… so the belt would rub against the rail. Take it off, completely disassemble it, and reassemble it correctly, and remount.
Oh yea, I figured out what the 2 corners were, to install. I had to remove the parts inside, and install these new parts on the outside.
Basically, I screwed up a number of times, even though I followed the manual, and the two video series that have been produced. I hope these build notes will help you to avoid these pitfalls.
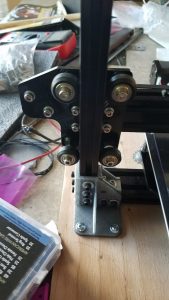
X-Stop and Washers. On the left, next to the belt, is the X-stop. Install that when you build the block, or just before you put it on the rail. I had to clip the off the zip ties to install that. You can see the washers I have installed all over. They help distribute the load and help strengthen the acrylic.
A zip tie across the top of the X-carriage between the belt is a good way to tighten your belt as well. It needs to be taut.
Finally, realize that A1-A3 + A5 are the rails. A lot of people look for bags or labels, and they are not there. You need to just know that they are the metal rails you use to build the printer.
Here are the rest of the build notes:
 |
X-Stop and Washers. On the left, next to the belt, is the X-stop. Install that when you build the block, or just before you put it on the rail. I had to clip the off the zip ties to install that. You can see the washers I have installed all over. They help distribute the load and help strengthen the acrylic.
A zip tie across the top of the X-carriage between the belt is a good way to tighten your belt as well. It needs to be taut.
I have a post about washers and where to get them, here: http://makerfun3d.com/washers-washers-everywhere |
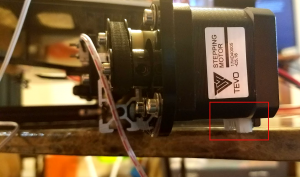 |
Be careful of how to install the motors. Here, I installed the Y motor with the cable attachment facing down. I had check this multiple times, and still missed this. Once again… apart comes the printer. |
 |
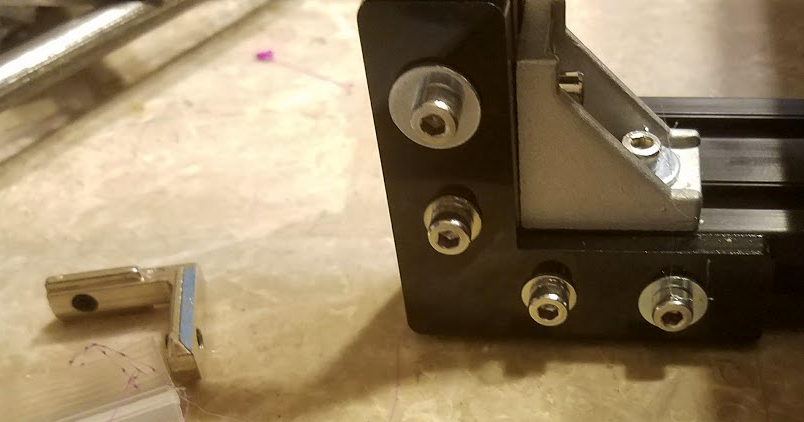
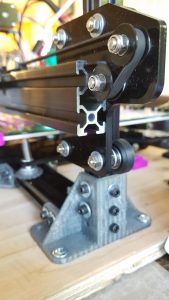
These aluminum corners are meant to be installed in the corners. They supply two. I recommend picking up more. I have installed one more, and will install one more when I upgrade the Z-Axis on my printer. The acrylic piece in front, I also put on the bottom, which was wrong. It should go on the top. I have seen people getting metal versions of those at hardware stores. Since I will be upgrading these corners with ThingiRob’s Brackets, I have been less inclined to do much beyond this. |
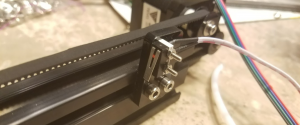 |
Here is the Y-stop. This goes on the opposite side from the motor. Thankfully, this one is pretty easy to install after the fact. Try to install this before you install the bed. You can do fine adjustments later. |
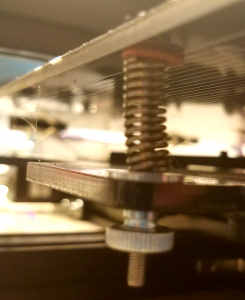 |
This is a photo of the bed installed. The proper order is Red Washer (To protect the bed from scratches from the spring), Spring, and then the thumb screw under that. I have included a flat washer under the spring as well, to help protect the acrylic from the spring. |
  |
This was a really annoying one.
In the instructions, it looks like you want that acrylic tab on the bottom. You really want it on top. The far left photo shows it assembled from the front. The right hand photo shows it from the back, with the belt running through it. This is a very common mistake. If you mount it wrong, the belt would rub on the middle channel. You don’t want that. |
| When mounting your PCB, realize that the acrylic mount is asymmetrical. There is a thin side and a wide side. I believe you want the thin-side facing out, to avoid the X stepper motor. | |
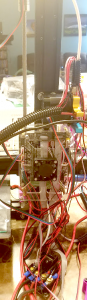 |
Finally, here is… THE MESS. This is my mess of cables that I have not gotten around to fixing yet. It is a disaster and has caused me more than a few frustrations. I’ve patched in some extra wire to extend the length on some, and even installed some extra connectors to make taking pieces out easier.
By the nature of the printers, this is not something that is easily fixed, but it is possible. |
| I’ll update these build notes with other “gotchas” I find along the way. I hope this helps someone avoid having to disassemble and reassemble the frame as many times as I did! |


Trackbacks/Pingbacks